How To Make Mozarella Cheese

How To Make Mozarella Cheese


What’s more delicious than a fresh slice of tasty mozzarella, stacked atop a thick slice of heirloom tomato and garnished with salt, pepper, olive oil, and a leaf of fresh basil? Not much. It can be hard to find truly fresh mozzarella, and the store-bought, pre-shredded kind is a pale imitation of the original. It is well-known that the best way to eat mozzarella is to enjoy it within a few hours of it being made, and better still if it hasn’t been refrigerated to preserve the stringy texture and creamy taste. It’s a good thing making your own is easy and fun, learn How To Make Mozarella Cheese below!

But first, a quick peek at the history of this unique cheese. Let's take a look How To Make Mozarella Cheese ; The history of mozzarella (and other pasta filata cheeses) runs parallel to the history of our relationship with the water buffalo in what is now Naples in southern Italy, from about the 12th century AD. Land inhabited by peasants was abandoned during raids and wars in that time, and the neglected land turned marshy, which is the water buffalo’s preferred terrain. Settlers moved in with buffalo herds, and began cultivating ‘black mines’ that produced ‘white gold’ – the buffalos’ rich and creamy milk. Because this fresh cheese was made from raw milk (As all cheeses were – pasteurization was not invented until the late 19th century) and due to the lack of refrigeration technology in these centuries, this cheese hardly ever traveled far from the area and was a local delicacy.


Much later, in the early 20th century, agrarian reforms focused on drying out the marshlands and buffalo herds dwindled. Cow milk began to replace buffalo in mozzarella recipes. During WWII, most of the remaining buffalo herds were decimated and while buffalo were reintroduced after the war, most of the mozzarella recipes brought to the U.S. by immigrants called for cow’s milk. These days it is still possible to enjoy mozzarella di bufala, though it is often an expensive and rich treat.
The technique used to make mozzarella is called pasta filata, or spun paste, and is unique in the cheese-making world. Curds are created in the traditional way, with acidic milk and rennet. The curd is cut, and then drained of whey and coagulated into a semi-firm curd. Now the fun part – that curd is steeped in very hot water or whey, and it begins to melt and change texture. The melting curd is taken out of the hot water, stretched, and formed into a smooth ball. On a molecular level, this changes the structure of the proteins, stretching what was a messy knot of proteins and fat into smooth strands of protein with pockets of fat and liquids in between. What’s amazing about this is that the cheese itself hasn’t changed; it still has the same ingredients, but the taste and texture are completely different! Mozzarella shares its origins with a few other cheeses, namely Burrata, Provolone, Caciocavallo, and Scamoza. All of these are similar cheeses but are treated differently after being made. Burrata and Mozzarella are eaten fresh, while Provolone, Caciocavallo, and Scamoza are further aged. All are delicious with a smooth, rubbery texture, thanks to the pasta filata technique.
Making mozzarella at home is easy and fun. It is very important, however, to choose the right kind of milk: use the highest-quality milk you can find, gently pasteurized, and preferably non-homogenized. Most milk found at supermarkets in the U.S. is ultrapasteurized, which means that the milk has been heated to temperatures as high as 280°F in order to kill any harmful bacteria. This harsh process adversely affects the molecular structure of the milk, making it more likely that the curd won’t stretch or will have an unpalatable texture. It’s often not possible to find out the exact temperature the milk has been pasteurized at (rules and regulations vary by state and country), so if your curd doesn’t work and you did everything right, it might be a milk issue. Try another brand of milk!
This recipe uses citric acid, which immediately acidifies the milk. Other recipes use lactic acid bacteria, which takes more time, but I’ve found this mozzarella to be delicious and indistinguishable from the “traditional” method. Before beginning there are a few items that need to be bought, I buy my cheesemaking supplies through Amazon.com or Cheesemaking.com.
How to Make Mozzarella Cheese

Quick Mozzarella Recipe

  • 2 gallons of good-quality whole milk (NOT ultra-pasteurized and non-homogenized if you can find it)
  • 3 ½ tsp Citric Acid
  • ½ tablet rennet OR ½ tsp liquid rennet
  • Large Pot or Dutch Oven
  • Colander lined with cheesecloth or fine-mesh sieve
  • Bowl for hot water
  • Slotted spoon or ladle
  • Thermometer
  • Curd Knife or long dull knife
  • Sharp Knife
  • Pickling/Brining Salt
  • Nitrile Gloves

Sanitize all Equipment With Boiling Water Before Starting

Measure out citric acid into a ½ cup of cool water, and stir to dissolve. Pour into Dutch oven. Then, pour milk into Dutch oven over the citric acid and stir well. Milk will begin to curdle as it’s now quite acidic.
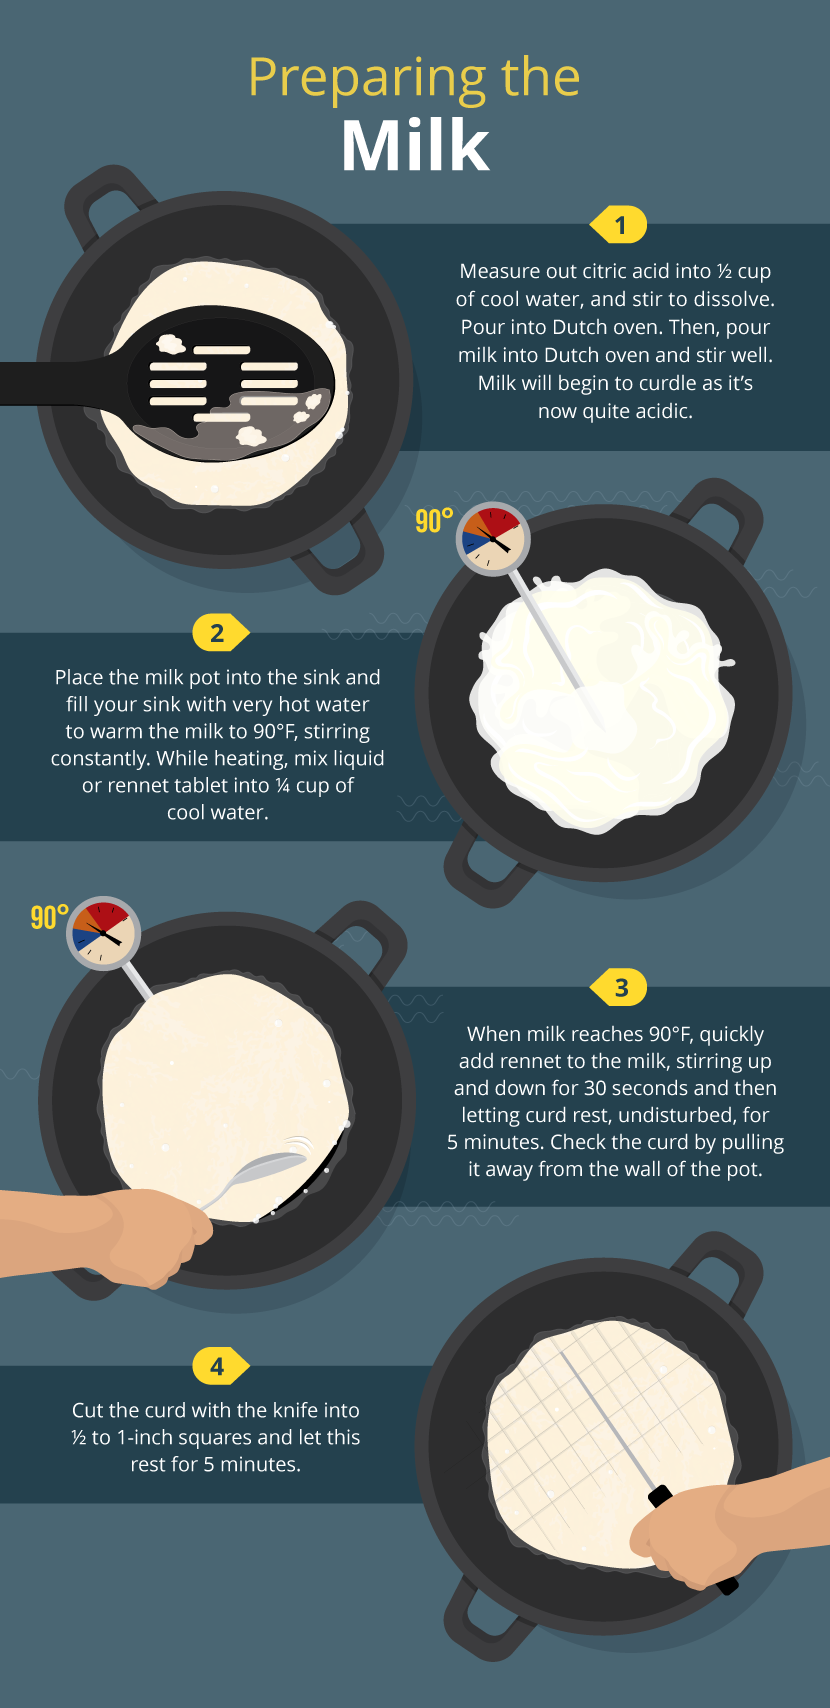
Place the milk pot into the sink and fill your sink with very hot water to warm the milk to 90°F, stirring constantly. You could also heat over low heat on a stovetop, stirring constantly. While heating, mix liquid or rennet tablet into ¼ cup of cool water.
When milk reaches 90°F, quickly add rennet to the milk, stirring up and down for 30 seconds and then letting curd rest, undisturbed, for 5 minutes. After 5 minutes, check the curd by pulling it away from the wall of the pot, or check for “clean break” with a knife.
Cut the curd with the knife into ½ to 1-inch squares and let this rest for 5 minutes.
Prepare the cheesecloth and colander or sieve over a sink or pot. I used both here for faster draining.
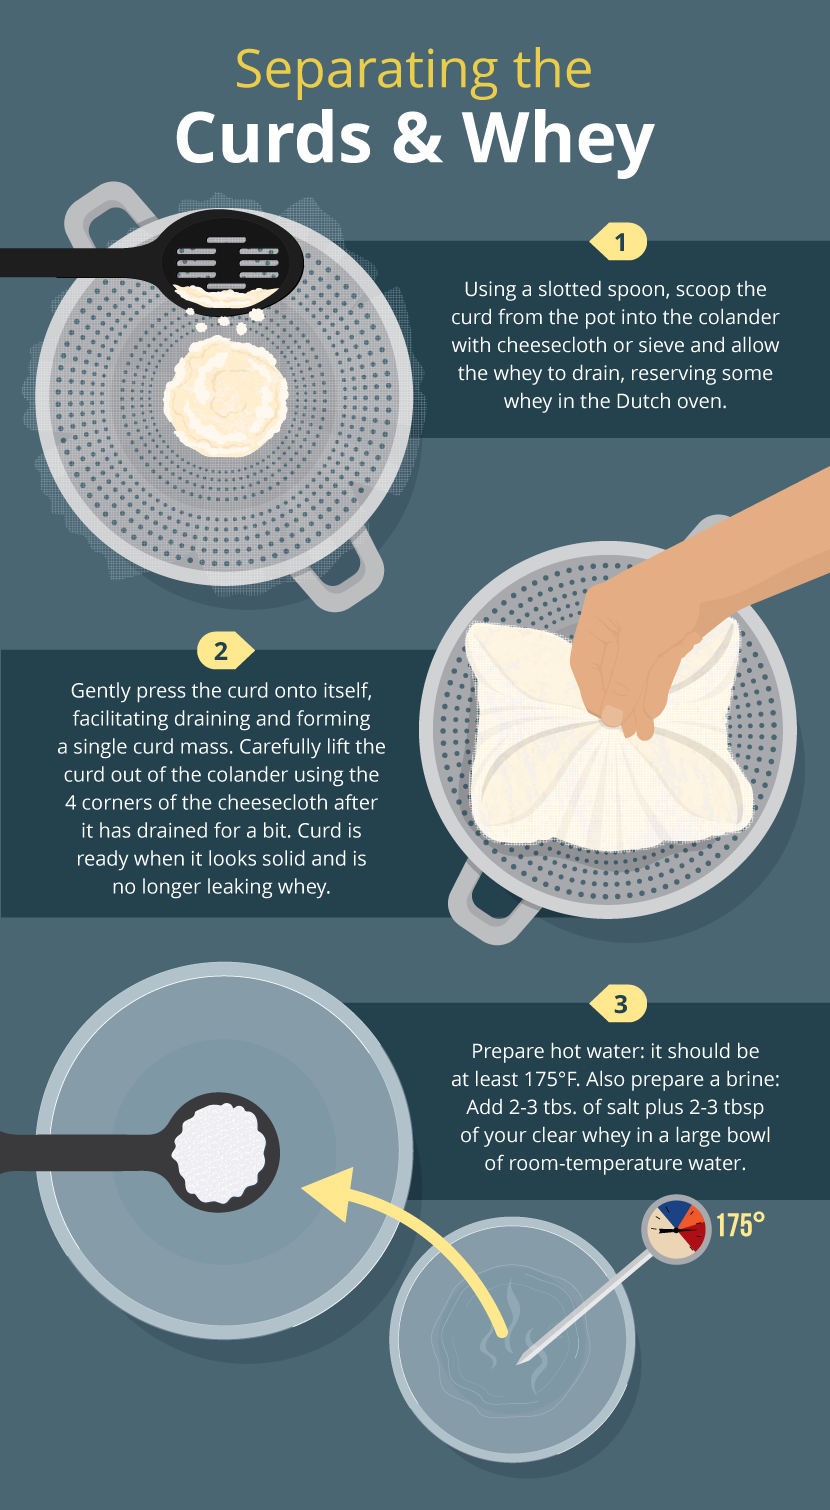
Using a slotted spoon, scoop the curd from the pot into the colander with cheesecloth or sieve and allow the whey to drain, reserving some whey in the Dutch oven. You can also scoop both curd and whey into the colander with a bigger cup, but draining will take longer.
Gently press the curd onto itself, facilitating draining and forming a single curd mass. If using cheesecloth, you can carefully lift the curd out of the colander using the 4 corners of the cheesecloth after it has drained for a while. Curd is ready when it looks solid and is no longer leaking whey.
As the curd drains, prepare hot water: it should be at least 175°F. Also prepare a brine: Add 2-3 tbs. of salt plus 2-3 tbsp of your clear whey to a large bowl of room-temperature water.
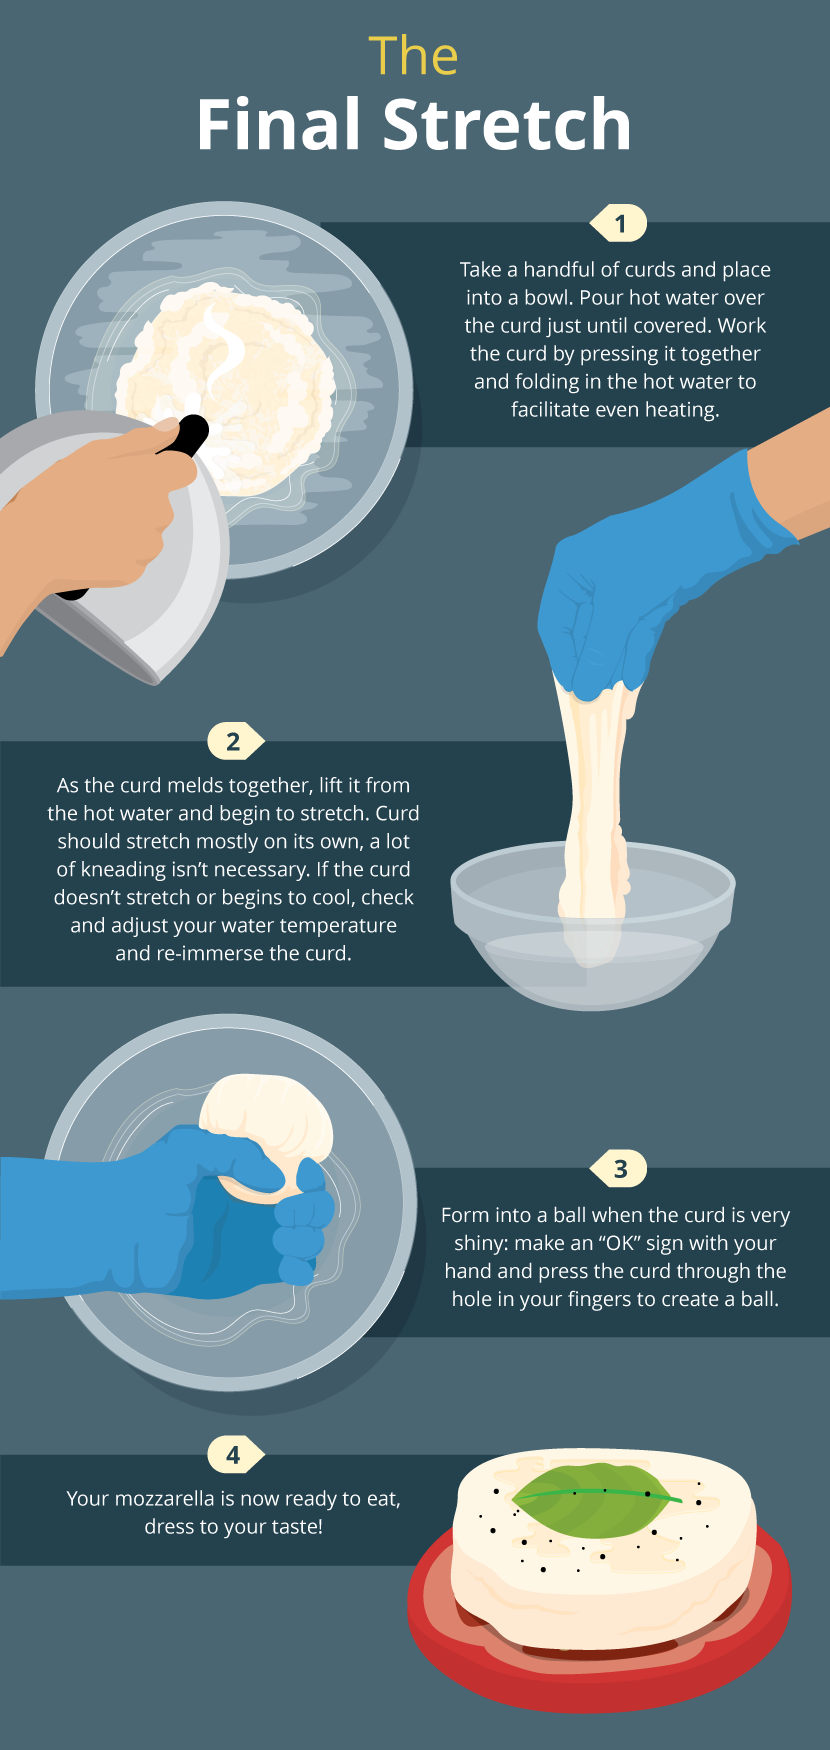
Wearing gloves, cut or break the curd into 1-2 inch pieces. Take a handful of curds and place into a bowl – pour hot water or whey over the curd just to cover it. Work the curd by pressing it together and folding in the hot water (with your gloved hands OR with a spoon) to facilitate even heating. As the curd begins to meld together, lift it from the hot water and begin to stretch.
Curd should stretch mostly on its own – a lot of kneading isn’t necessary. If the curd does not stretch, check and adjust your water temperature and re-immerse the curd. If there continues to be stretching issues, it might be a milk problem.
If curd begins to cool too much, or if it begins to tear, place it back in the hot water to reheat. Add more hot water if necessary. Form into a ball when the curd is very shiny – make an “OK” sign with your hand and press the curd through the hole in your fingers to create a ball.
At this point your mozzarella is finished! Place in brine and let sit for 20-40 minutes, then refrigerate or enjoy right away!


How to download video from website

How to download video from website


Downloading a video through its source is a way to download a video from a website if there is no download link available. Some websites only allow users to stream videos from their site and do not provide users with a download link. The website may be trying to encourage visitors to return to their website every time they wish to see the video and, as a result, do not want the video to be downloaded. How to download video from website is easy to learn for standart internet users, even beginner level.

how to download video from website

Step 1

Visit the video's website. Navigate to the page where the video is hosted. The video will likely be embedded into the webpage where it can then be streamed.

Step 2

View the page source code. All browsers have a feature for view the page source. On Google Chrome, right click anywhere on the webpage and click "View Page Source." On Internet Explorer, right click anywhere on the page and click "View Source." All browsers will bring up a "Source Code" window that shows all the code for the webpage. This is where the download code for the video will be found.


Step 3

Navigate through the source code and look for the link that contains the video file. This process can be made easier by click "CTRL" and "F" at the same time to bring up the "Find" search menu. Type in popular video file extensions to locate the source code of the video. Some video file extensions are: avi, mpeg, mpg, wmv, mov, flv and swf. The source code of the video should resemble something like: "http://www.sitename.com/media/video/stream/filename.flv." Copy this code by highlighting it with the mouse then right clicking it and clicking "Copy."

Step 4

Open Windows Media Player. Click "File" then "Open" and paste the video code into the "File Name" slot. Click "Open." The video from the Internet site will begin to stream. Wait for the video to load. Click "File" then "Save As." Type in a name for the video file in the "File Name" window. Navigate to the directory where the file should be saved and click "Save." Go to the directory where the file was saved and double click the file to play it. As seen, How to download video from website is not a serious problem for us. 

How to convert powerpoint to video


You learn how to convert powerpoint to video and can now save your Microsoft PowerPoint 2010 presentation as a video, making it easier for you to distribute, and easier for recipients to view.

how to convert powerpoint to video

In this article


Why turn your presentation into a video?

When you want to give a high-fidelity version of your presentation to colleagues or customers (either as an e-mail attachment, published to the web, on a CD or DVD), save it and let it play as a video. In this article, you can easily learn how to convert powerpoint to video.

In PowerPoint 2010, you can now save your presentation as a Windows Media Video (.wmv) file, and distribute it confidently, knowing that your animated, narrated, multimedia presentation will play without a glitch. If you do not want to use the .wmv file format, you can use a preferred third party utility to convert your file to another format (.avi, .mov, etc).
Some tips to remember when recording your presentation as a video:
  • You can record and time voice narration and laser pointer movements in your video.
  • You can control the size of the multimedia file and the quality of your video.
  • You can include animations and transitions in your movie.
  • Viewers do not need to have PowerPoint installed on their computers to watch it.
  • If your presentation contains an embedded video, the video will play correctly without your needing to control it.
  • Depending on the content of your presentation, creating a video may take some time. Lengthy presentations and presentations with animations, transitions, and media content will likely take longer to create. Fortunately, you can continue to use PowerPoint while the video is being created


Record and time voice narration and pointer movements

Note: To record and playback a narration, your computer must be equipped with a sound card, microphone, and speakers.
Good presentations include concise slide content which is supported and reinforced by a presenter's gestures and discussion. When creating a video version of a presentation, you'll probably want to “capture” the human element of the presentation by recording and timing voice narration and even laser pointer gestures.
You can record your slide show prior to sharing it with your audience, or you can record a narration while actively delivering a presentation to a live audience and include their comments and questions in the recording.
For procedures on how to record and time narration in a slide show, see Add narration to a presentation. And, for procedures on how to use the laser pointer, see Turn your mouse into a laser pointer.

Save your presentation as a video

Create a video
  1. Create your presentation.
  2. Save the presentation.
  3. On the File menu, click Save & Send.
  4. Under Save & Send, click Create a video.
  5. To display all video quality and size options, under Create a video, click the Computer & HD Displays down arrow.
  6. Do one of the following:
    • To create a video with very high quality, yet a large file size, click Computer & HD Displays.
    • To create a video with a moderate file size and medium quality, click Internet & DVD.
    • To create a video with the smallest file size, yet low quality, click Portable Devices.
      Tip: You'll want to test these out to see which option meets your needs.
  7. Click the Don't Use Recorded Timings and Narrations down arrow and then, do one of the following:
    • If you did not record and time voice narration and laser pointer movements , click Don't Use Recorded Timings and Narration.
      Tip: The default time spent on each slide is set to 5 seconds. To change that, to the right of Seconds to spend on each slide, click the up arrow to increase, or the down arrow to decrease the seconds.
    • If you recorded and timed narration and pointer movements , click Use Recorded Timings and Narrations.
  8. Click Create Video.
  9. In the File name box, enter a file name for the video, browse for folder that will contain this file, and then click Save. You can track the progress of the video creation by looking at the status bar at the bottom of your screen. The video creation process can take up to several hours depending on the length of the video and the complexity of the presentation.
    Tip: For longer videos, you can set it up so that they create overnight. That way, they’ll be ready for you the following morning.
  10. To play your newly-created video, go to the designated folder location, and then double-click the file.


What parts of a presentation will not be included in a video?

The following items will not be included in a video that you create using PowerPoint:
  • Media inserted in previous versions of PowerPoint. To include these, you can convert or upgrade the media object.
    Tip:  For example, if you inserted the media using PowerPoint 2007, it will be linked and it will play in the presentation.  However, when you export the file as a video, the linked media will be dropped.  You can convert the file to the new file format (click the File tab, and under Info, click Convert) - or you can right click the media object, and then click to upgrade, it will embed the file and export it correctly.
  • QuickTime media (unless you have a 3rd-party QuickTime code ffdShow, installed) and you must optimize for compatibility
  • Macros
  • OLE/ActiveX controls


What to do with your video after creating it?

After you create a video, you can share it with others by using the following methods:


How To Download Videos From Youtube


How To Download Videos From Youtube


When the topic of downloading 

How To Download Videos From Youtube

comes up, there's a side subject that must be broached: Is it legal? When it comes to copyright, as long as you're downloading a video for your own personal offline use, you're probably okay.


How To Download Videos From Youtube

will be clear soon at this page.


It's more black and white when you consider Google's terms of service for YouTube, which read: "You shall not download any Content unless you see a 'download' or similar link displayed by YouTube on the Service for that Content."
After all, watching YouTube videos offline is taking money out of Google's pocket and those of the videos' creators. There's a reason YouTube runs pre-roll ads; a lot of people make a living that way.

So, let's be clear: taking video from YouTube is a big no-no. If you want to share a video, YouTube makes it pretty damn easy to do, from embedding to emailing to sharing via social networks. You don't really need to download a video most of the time. But maybe you have your reasons. We won't judge. If you must download a YouTube video—absolutely need to, just for yourself, and not for dissemination, and not to be a total douche-nozzle—here's how.


How to Download Youtube Videos Software

Third-party software is where many will find the best control for downloading online videos. Typically, you just paste the URL for the YouTube video you want into the app, and it downloads the highest quality version it can find, typically in MP4 format.
It used to be that YouTube videos were all Flash-based, so your download was an FLV file, but those tend to be harder to play back. MP4, short for MPEG-4 Part 14 multimedia format, plays everywhere on anything. Here are some options:
Freemake Video Downloader
Free (with caveats); Windows
Freemake claims it can download video from over 10,000 sites; "Loved by 83 Million users," it brags. With YouTube videos, it grabs things in any format, lets you save links, and downloads multiple videos at once. It also claims to be the fastest, grabbing a two-hour HD video in four minutes, but users can limit the speed if they're on a throttled Internet connection. And that price? It's a no brainer. If you only want to grab music out of the videos you watch, it also offers the free 
Freemake YouTube to MP3 Boom.
The caveats: Freemake throws in extras when you install, including a third-party antivirus program and a forced change to Yahoo as your search engine in all your browsers. Make sure with this, or any of these programs, you do the custom install to avoid unwanted changes to your system.


Airy
$19.95; Mac/Windows
All you need to do is copy a YouTube link from the browser into Airy, and it does the rest. It even works with YouTube playlists. You set the quality or format, including extracting audio into MP3 format. Airy integrates with the Web browser so it can be a one-click affair to download. The biggest downside may be that Airy appears to only work with YouTube; no other video sites are supported. If you show them proof you're migrating from a competing paid product, Airy will give you 50 percent off the price.


Free or $29.90/year; Windows/Mac
YTD works not just with YouTube but over 50 other video-hosting sites. It will convert files to other formats. Pay the yearly fee and you get more functions, like downloading multiple videos at once and download acceleration, plus no advertising. YTD has Android and iOS apps; the iOS version won't actually download video, while the Android version can, but you can't install it from Google Play, you have to use the APK file it provides (with instructions). We have more on that below
. YTD is the old guard in this area, but it's a little hard to use.


YouTubeByClick
Free to $24.99, Windows
The developer of YouTubeByClick says YTD was an inspiration, and the software has most of the same features. It captures video from over 50 sites, including via playlists or entire channels worth of content, plus downloads video in full HD, converts to your format of choice on the fly, like making MP3s for your music collection. And it can integrate with the browser (Chrome, Firefox, IE, and even Edge) for one-button downloads right from within YouTube.


Free to $49.95 (Ultimate); Mac/Windows
It's expensive, but AVC Ultimate claims not only that it can download video from 100+ sites like YouTube and Facebook, it can also capture streaming video—like from Netflix. It'll also rip DVDs and provides some video editing.


Free, Windows
Another freebie, DLNow Video Downloader has a list of over 570 sites it works with to download video. It'll do an MP3 conversion if you only want the audio, and grab any video in the best possible quality, even live streams or multiple videos at once. It's also completely free.


Free to $19.95, Windows
The folks at Softorino have a product called Waltr specifically for converting video that plays on the iPhone or iPad—without using iTunes or jailbreaking. Naturally they'd want a program for grabbing videos to convert. The YouTube Converter does just that, getting videos sans ads for offline viewing, but also with the Waltr functions integrated, so you can sent YouTube vids directly to iOS devices.

Helper Sites

Want to avoid installing software? Download helper sites do the work for you, providing conversion and then a download link—you don't have to install anything. It can take a lot longer, depending on the size and quality of the video you want—a typical two-minute movie trailer in 1080p can be around 50 megabytes—but you can't beat the convenience. There are hundreds of these types of sites out there—seems anyone with a modicum of coding ability has set one up. They have names like SaveFrom, FLVto, GrabClip, VideoGrabber.net, keepdownloading, getvideo.at, TubeOffline, etc. Such sites can easily go from useful to suspicious, especially if they get popular; if your browser (or your instincts) throws up warnings, avoid and move to the next.

A few of these sites try to go the extra distance by making it easy to grab video by letting you change the URL of a vid at YouTube just slightly, so the service takes over. For instance, change the "youtube.com" part to "vdyoutube.com" and the site VDYouTube takes over. (Or you can still cut and paste the URL into the site.) Watch this bizarro-world video below with robot voice over for how that works.
Other sites that do that: Save-Video.com (put the word "magic" between the "you" and the "tube") and YoutubeMonkeydownloader (change to "youtubemonkey.com") and SaveFrom.net (add "ss" before the "youtube.com".)
One of the more popular sites that did this, YouTubeDownloader.com, apparently got bought by TubeNinja.net; if you use its "dlv" or "dl" in front of the "youtube.com" part of the URL, it now brings up a legality warning—the site got a warning from YouTube's lawyers. (I also got one of those false malware warnings on the site; avoid it.) Here are a few others that stand out.


ClipConverter.cc does the usual: it takes a URL and lets you download the video hosted there in multiple formats, both video and audio. Change the start and end time of the video if you like. YouTube, Vimeo, and others are supported; it also offers browser add-ons for Chrome, Firefox, and Safari.


Supporting downloads from an alleged 10,000 sites, KeepVid does more than video (as evidenced by supporting downloads from SoundCloud). Just paste in the video's URL and click download next to it—don't click the big advertisement that also says "download." You'll get back a slew of download options, both video and audio, in every size possible, including MP3 audio. Right-click the file you want and select "Save Link as" to download to the desktop. The site requires Java to run.


Simple is what you need, and ConvertToAudio.com is that. Plug in the URL, pick a format for conversion (audio or video, though MP3 is the default), even set the volume control, then click Convert It! You'll have to wait a while for the conversion. They offer a bookmarklet to put in the toolbar—click it whenever you're on a video site to start a conversion. (Also try LinktoMp3.com or YoutubeMp3.to, or a slew of others with the same functionality.)


Browser Extensions

A browser extension can help you save a step. But you're going to run into some issues with downloading video from YouTube, especially if you're using Chrome as your primary browser.

The Chrome Web Store—where you get such browser extensions—is controlled by YouTube owner Google. Even an extension ostensibly for this purpose—the obviously named Video Downloader professional—states right up front in its description, "The download of YouTube videos to hard drive is locked because of restrictions of the Chrome Store." Google isn't in the habit of letting one division screw over the others. The download of any RTMP protocol video (protected videos) or streaming video also isn't possible. (Video Downloader Ultimate, however, is software from the same developer that downloads from YouTube, Facebook, Vimeo, etc.)

It's the same with other extensions like vGet. But you can use them on other sites with video, of course. Just not YouTube. Want to get around it? You need an extension that doesn't come from the Google Web Store. Download YouTube Chrome says it'll do the job, and even spells out how to do the install without the assistance Chrome users typically get from Google Web store.
Other browser extensions that can do the job, if you don't get them from Google:

Free; Opera, Safari, Chrome, Firefox, Internet Explorer, Chromium-based browsers
This downloader tool is on all the platforms, and even has an installer for Chrome that skips the Google Web Store. It puts a "download this video" menu right on any YouTube page you load, with all the format options on display.


Free; Firefox, Chrome

Supporting a huge number of sites—even those for adults!—this extension adds to your Tools menu and provides a bunch of format options for download when you're on a page with a supported video. You'll know when the icon for the extension animates. If you upgrade to Premium for $28.50, you can convert files (but only on Firefox). They also have a Kiva initiative page, where they'd prefer you donate funds to those in need. They've already raised over $75,000.

Mobile

Remember that problem of using Chrome extensions from the Google Web Store to try and grab YouTube videos? You're going to have an even bigger issue when you want to get an Android app from the Google Play store since Google's got an even tighter grip on the apps there. Of course you can't actually download anything with your officially sanctioned YouTube apps. Unless you live in India.
That said, with Android it is possible to install apps without going through Google. WonTube's Free YouTube Downloader for Android is one—you can download the APK (Android application package) file to sideload on an Android device. Find it in your device's downloads and click it to install. (You may have to go into your security settings and enable "Unknown sources.") After that, launch the app, use it to surf around YouTube, and the download links and video management features are built right in. It's buggy as an ant hill covered in syrup, but one of the few options. YTD, mentioned above, has a similar app.
On the iOS platform, you'd think there would be no such restriction, since Apple and Google aren't exactly the best of pals. But on the few apps I tried in the first edition of this story not only wouldn't they download from YouTube, they're not even available anymore; it's likely with iOS 9 they wouldn't have worked anyway. One of those apps said in its description, "downloading from YouTube is prohibited due to its Terms of Service." Apple is ensuring that app makers play by the rules—even Google's rules. All the better to get Google to block someone who eventually does something illegal with iTunes downloads, probably.
There are workarounds. One is using a free iOS file manager app like Documents 5. You can use its built-in browser to visit the Helper Sites above (I used SaveFrom.net successfully), and download a YouTube video to the built-in downloads folder of the app. Hold down and drag the file up, until you're back on the main screen, then drag it down to another folder to place it in the Photos app (like in the animation below). You'll need to give Documents 5 permission to access Photos the first time. You can then access the video like you would any video taken on the phone or tablet.
Another workaround: Apps like Video Downloader Pro For Dropbox, Google Drive, OneDrive. It doesn't download video from the video site like YouTube, but does make it easy to get video from a cloud storage/backup platform and stick it in your Camera Roll to watch later.
Or you can, of course, go old school: use iTunes to sync videos on your Windows or Mac desktop to iOS, even use AirDrop. But it's not the same. Chances are, the minute you find an app that can download YouTube videos, it will get "fixed." The only real option to do that is jailbreak your iPhone to use sideloaded apps that download what you want.